Lesson 1: Paint and decorate
your own game world
Checked with version: 2018.2.1 - Difficulty: Beginner
In the first lesson, you’ll get step-by-step instructions for how to quickly build your very first Scene in Unity using the Tilemap feature. You'll learn how to decorate it with environmental art and then test it out in Play mode!
Set yourself up for success by setting aside at least 1 hour to complete this lesson. If you get stuck, seek out answers and help in our moderated 2D Game Kit forum.
Downloading and importing the project
You can download and install the 2D Game Kit from the Asset Store within Unity.
- Open the Unity Hub (the Unity Hub is the window you see image below, which appears when you first launch Unity). Note: If you already have the Unity editor open, then close/quit Unity so you can follow these instructions exactly
- Make sure you have Unity 2018.2.1 or a later version — the version you have can be seen at the top of the Unity Hub window. You can install different versions of Unity here
- Create a new project by clicking New
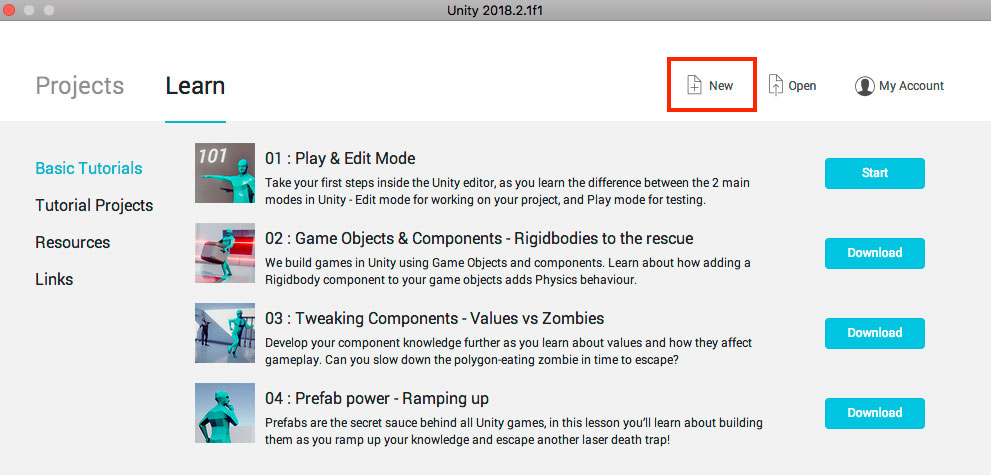
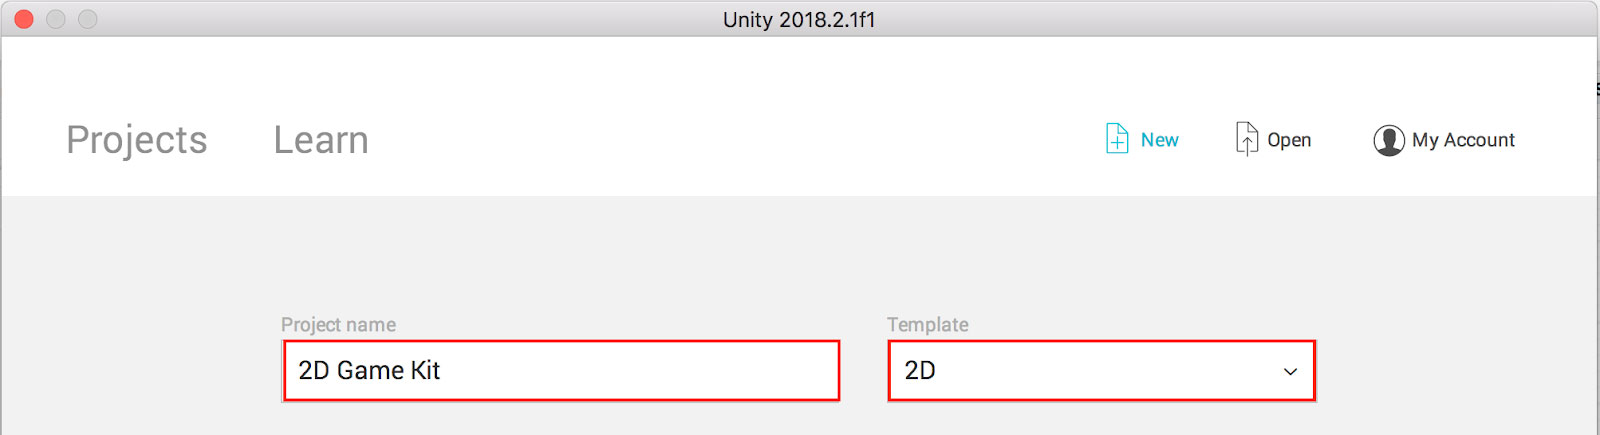
- Name your project, then select 2D under the Template dropdown. Click Create project
A new project will open in Unity.
- Find the Asset Store tab and click on it. This will open the Unity Asset Store within the editor. In the search bar type "2D Game Kit" then select 2D Game Kit by Unity Technologies. The Asset Store will open the overview page of the kit. Click Download/or Import
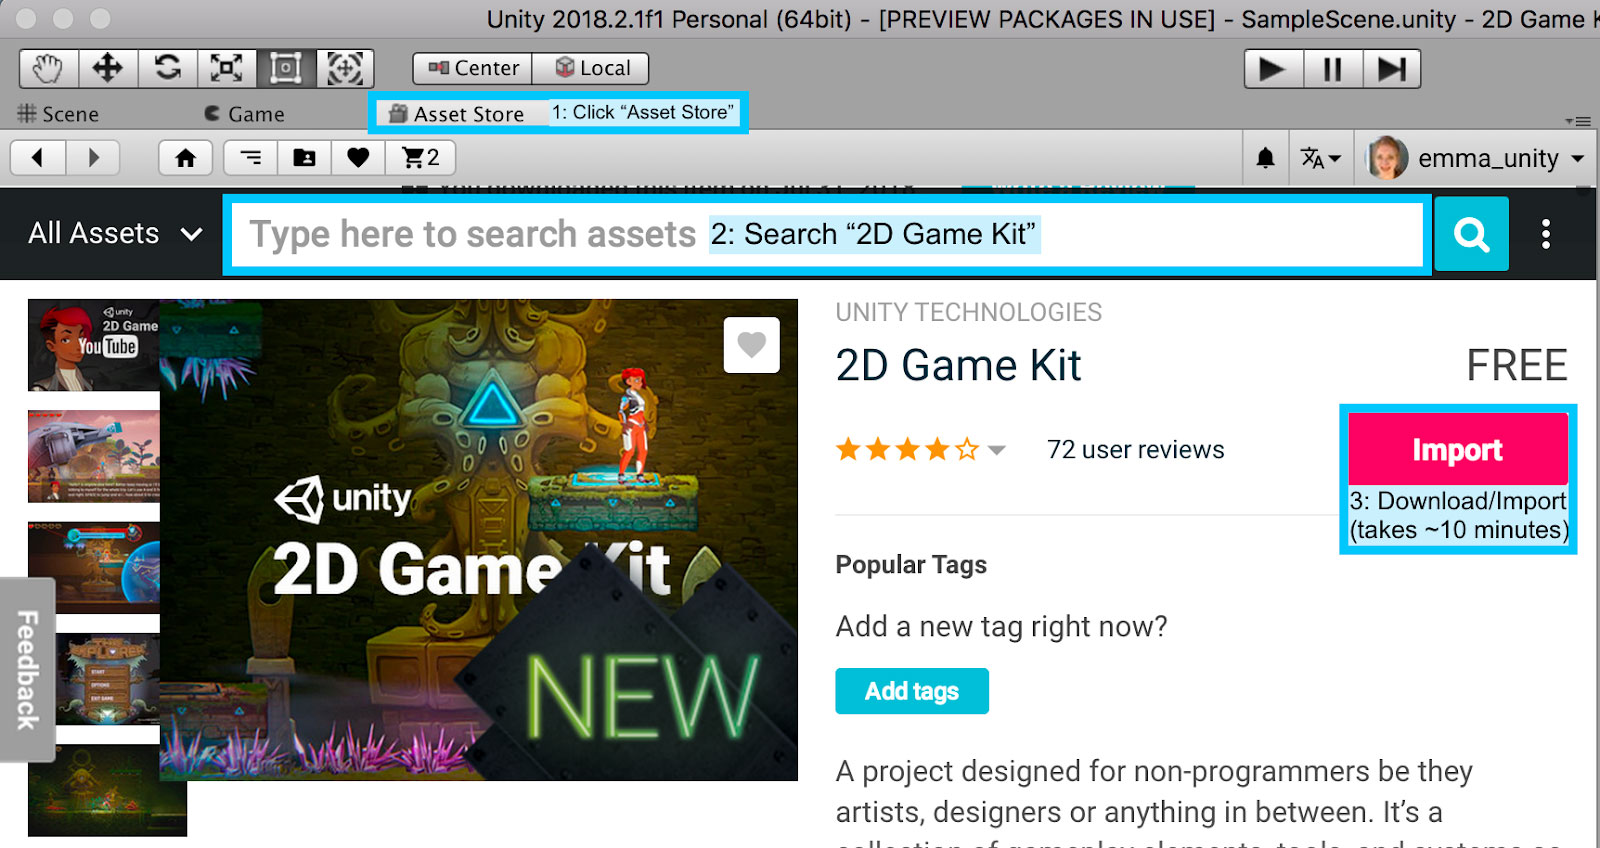
A pop-up window may warn you that importing a complete project will overwrite your current project settings. That’s OK, since this is a new project we created. Click Import on the pop-up window. An Import Unity Package window will appear with the 2D Game Kit project files all checked.
- Click Import
It will take ~8-10 minutes to import, so grab a cup of coffee and get ready to start creating!
Creating a new Scene
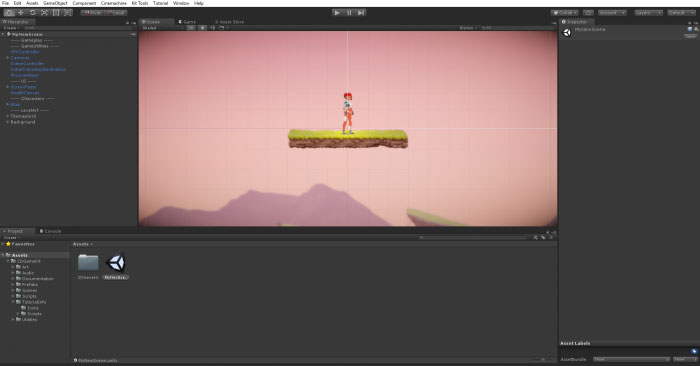
Once the 2D Game Kit package is done importing, you're ready to create a new Scene. The project allows you to automatically create a new default Scene. The Scene you’re about to create already has the following elements: Ellen (our hero), a small platform, Health UI, and everything you need to move around and attack. But before you do that, here's a little Unity 101 on Scenes that you need to know:
In Unity, think of each Scene file as you would normally think of different levels in a game. Scenes contain the environments and menus of your project. It's a good idea to get in the habit of saving your Scene as you work on it. To save the Scene(s) you’re currently working on, in the menu select File > Save Scenes or press Ctrl + S (Windows) or Cmd + S (Mac).
Let’s create a new Scene:
- Click on the Scene view tab, then
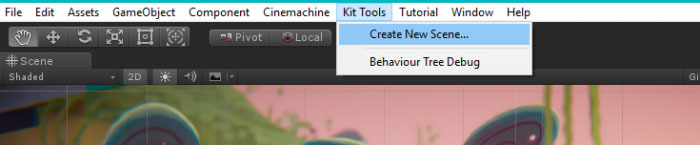
- In the top menu, click Kit Tools
- Choose Create New Scene...
- A new window opens
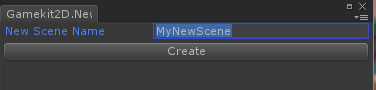
- In the empty field next to New Scene Name, enter the name you would like to call your Scene. Note: In this text version of this lesson you’ll see the name “MyNewScene”; however, if you watch the supporting video at the bottom of this page, the name “MyLevel” is used
- Click Create
Find the Project window. The Project window is the gray window as shown in the image below. This is where Unity added the new Scene you created. Your Scene will be located in the root of your project, in the folder named Assets. Go take a gander.
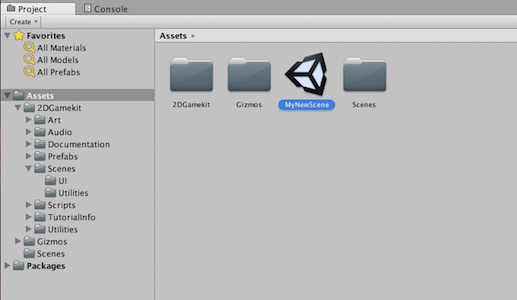
Unity also opens the new Scene in the Editor, so you can start working on it.
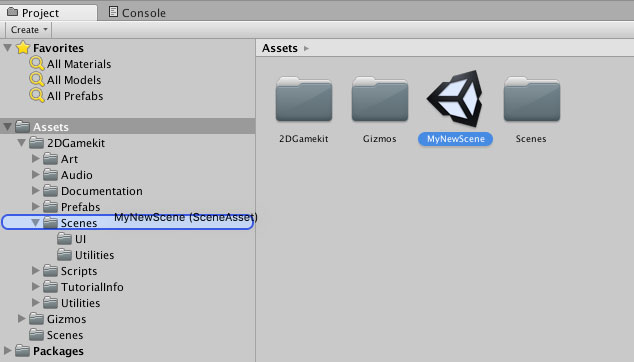
Click and drag your new Scene from the Assets folder into the Scenes folder (Assets > 2D Game Kit > Scenes). This will be handy at the end of Lesson 6 when you learn how to teleport Ellen from one Scene to another.
- Click the Play button at the top. This will change the editor from being in Scene view to Game view
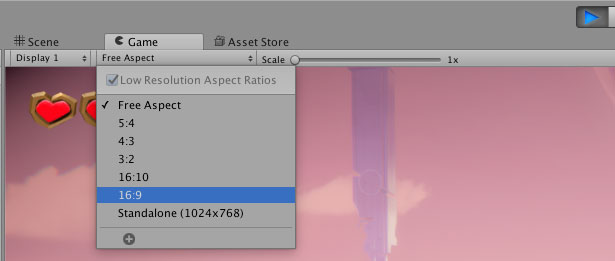
- Below the Scene view and Game view tabs, click on the Aspect Menu (it probably says Free Aspect)
- Select 16:9. This ensures a good visual representation of what the player sees when playing your game
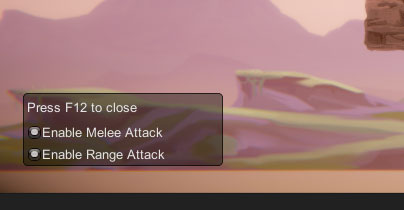
We have included a debug menu. While still in Play mode, press F12 on your keyboard to bring up the option to enable or disable each of Ellen’s weapons in the Game view. For now, make sure both weapons are enabled.
- Exit Play mode by clicking the Play button
- Save your Scene! In the menu select File > Save Scenes or press Ctrl + S (Windows) or Cmd + S (Mac)
Painting a level
The 2D Game Kit uses Unity’s Tilemap feature, which is designed to help you draw out a level quickly and easily. The Kit has everything set up for you, so you can get started straight away.
Now for the fun part! Start designing your level:
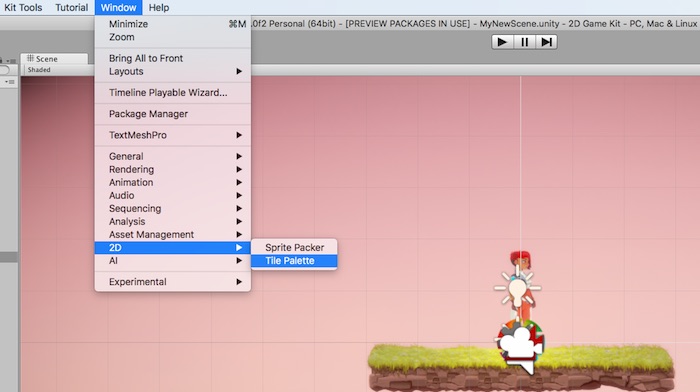
- In the top menu, go to Window > 2D > Tile Palette
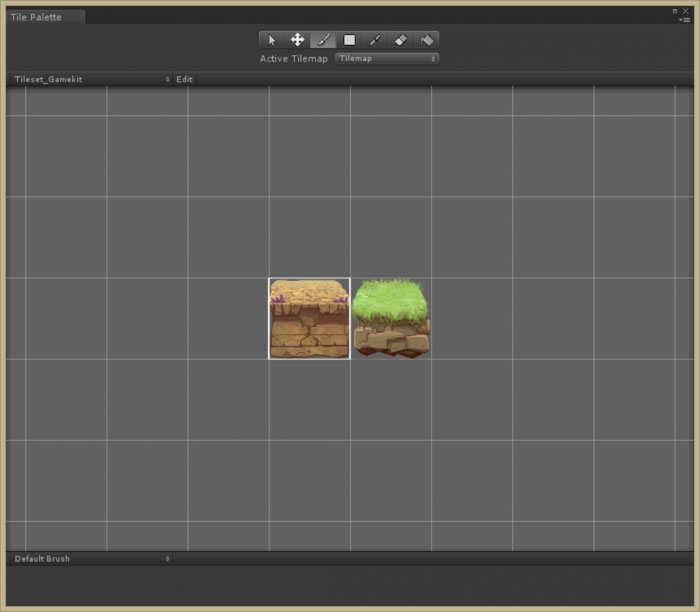
The Tile Palette window looks like this:
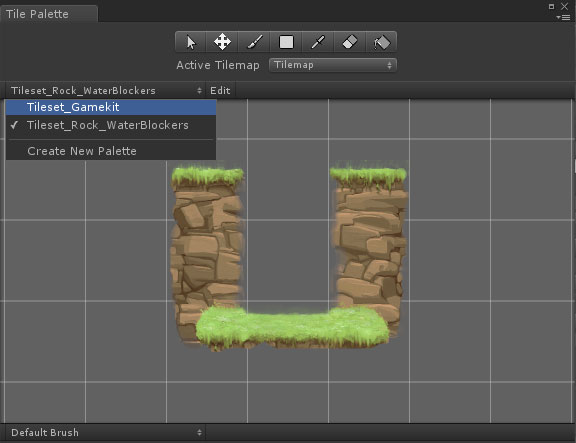
We have created two Tilesets that allow you to draw out levels. These tiles use the Scriptable Tile system of the Unity Tilemap. They automatically choose the right sprite for a platform. You have two styles of sprites to choose from: Grassy Rocks and Alien Structure.
You need to make sure the correct set of tiles is selected in Tile Palette:
- Click the TilesetRockWaterBlockers
- Click on TilesetGamekit
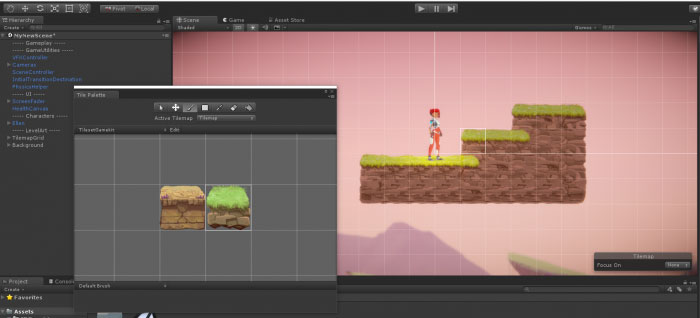
Now let’s paint some tiles in the Scene to create a level:
- Click on a tile in the the Tile Palette to select it
- Make sure you're in the Scene View
- Left-click and drag to draw your level
Tip 1: If you make a mistake, you can hold Shift and left-click or drag to erase Tiles.
Tip 2: If you want to view more of the scene to left, right, up, or down, click the Hand tool right above the Scene view tab (or press Q on your keyboard). Now you can click and drag around on the Scene. To get back to the Move tool press W.
- Once you’ve drawn out some of your level, close the Tile Palette window
- Save your Scene
Decorating
You already learned about the Project window (the window where the new Scene you created is stored). You can see there are other windows in Unity too, like the Hierarchy window and Inspector window. You’re going to be doing a lot of dragging and dropping from the Hierarchy window to the Inspector window, so it’s easier if you move the Hierarchy window next to the Inspector window. Currently, the Hierarchy window is probably in the top left and the Inspector window is in the top right of the Editor. Watch the gif below carefully to see how to move the Hierarchy window. Notice where the cursor is on the screen when the click & drag motion is released: It's about halfway down over the right side of the Scene. At that point you can see that the outline of the Hierarchy window is hovering in the correct place. When the click is released, the Hierarchy window is no longer just an outline, it's the real deal. Now it's your turn: Click and drag the Hierarchy tab to about halfway down the right side of the Scene until it appears as a skinny window in between the Scene view and the Inspector window, then release. Voila! Your life just got easier.

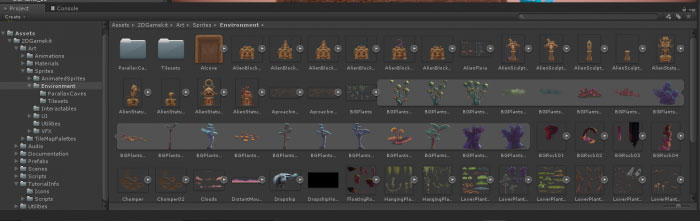
To make your level Instagram-worthy, find the decorations in the Project window. Navigate to Assets > Art > Sprites > Environment. A lot are stored in sub-folders, so don’t forget to expand the small arrows and see what other sprites are in that category.
You can decorate your Scene by dragging and dropping Environment sprites into it. When you drag anything into your Scene, you will notice it appears in the Hierarchy. You can click on anything in the Hierarchy and then examine and manipulate it directly in the Scene view and/or in the Inspector window. You'll get a lot more practice doing this in the next lessons, so you can always move on to those and come back to decorate once you've gotten more used to the editor. If you do decorate now, remember to save your Scene.
Testing your level
Now that you have created a level, it’s time to run around in it and test it out! Whenever you want to test your level, you need to enter Play mode.

- To enter Play mode, press the Play icon at the top of the Editor. Note: Any changes made in Play mode will not save, so always remember to exit Play mode before editing your Scene again. Remember, to exit Play mode, just click Play again
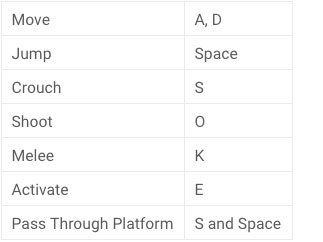
Once in Play mode, use the following controls for Ellen (the player character) to test your level, and when you're done, check off that you've completed Lesson 1 at the bottom of the page!
Supporting live training videos
Lesson 1: Intro & getting started + decorating
Note: Lesson 1 instructions for creating and building your first Scene in Unity begin at 2:33
Extra credit: Ellen, damager components, and placing hazards
Note: The instructions in the video below are extra credit and are not included in the text instructions above from Lesson 1. You can move straight to Lesson 2 without completing the steps in this video.